Tuesday 29 January 2019

Looking at SS 2019 colours and patterns

Now I've explored my own body colours a bit I'm looking at the fashion colours for SS 2019 to see how they compare and work out which colours to focus on now. My collection of pins for this season


Fashion Colours SS 2019
From the marvellous https://fashionvignette.blogspot.com/
Pantene colour of the year living coral
The more intense versions of this are 75% colours for me

Add caption
Too intense for me

What would work for me?

Princess blue 100% only if muted

Fiesta 75%
Pink Peacock 75% only if muted
Living Coral 75%

Toffee 25%
Pressed rose 25%

Sweet lilac 25%
Jester red 25%

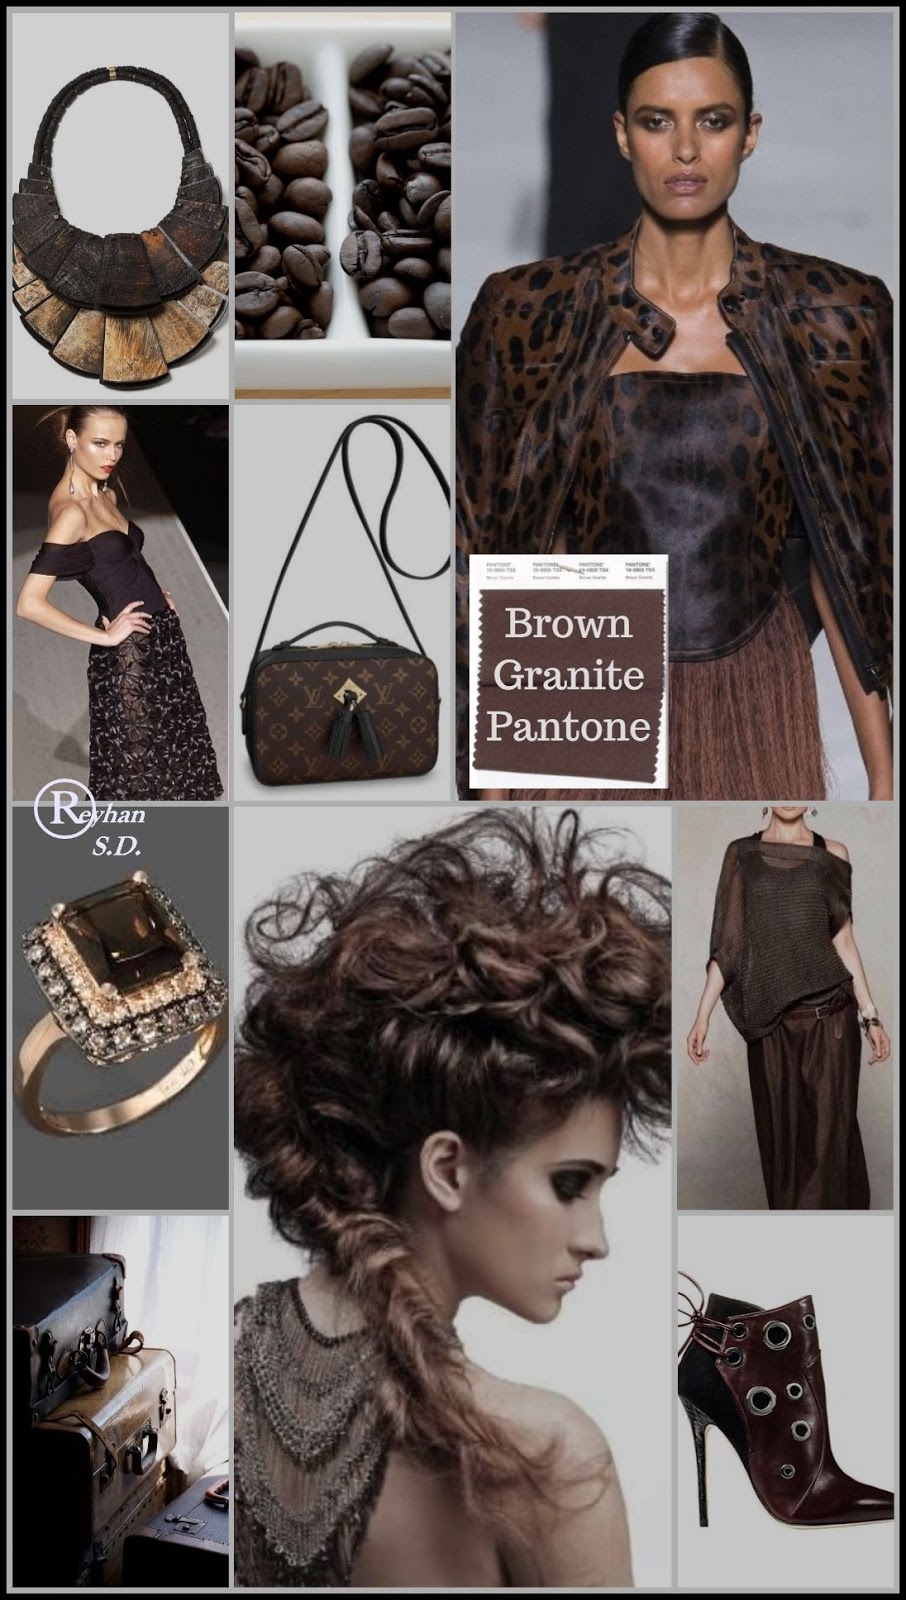
https://i.pinimg.com/originals/
64/24/82/642482b002f889d33fdcd6058bc7aae9.jpg
Brown granite is a 25% colour for me
Hm, they're all variations on pink with no other blue or green than the rather too pure princess blue...
Too strong for me
Another prediction range


OK, looking at this one, I can add
Peacock blue 100%
Aqua 75%


Sticking to the principle that the colours I like 
are the ones that go with my natural colouring, 
then I am going to go for:

Peacock blue or blue-grey all over

Fiesta & Living coral & aqua with neutrals 

Blue grey or brown granite neutrals (and may have to use a light neutral eg pinky beige or soft white)

Accessories in sweet lilac, muted pink peacock, jester red
Mmmm nice.


Fashion Patterns SS 2019


I see grid checks, Prada regular geometrics (with straight and ovals),
and fun prints eg D&G lollipops in very un-beachy colours,
and Stella Jean vintage look, all of which work for me.


https://fashionvignette.blogspot.com/
These large blocks of strong pastel colour always
appeal. I could wear the lavender 25%, jade (100% pastel),
 sky blue 25%, pink 25% and princess blue 100%
I like the abstractness though, and
can imagine them influencing something.

Aha! I can work with this.
Variations on calm tweed/checks


https://fashionvignette.blogspot.com/
This appeals to me, goes somewhat with 30s style, and is in some of my colours
mint green, cherry red 100%, neutral grey 100%, bluegrey100%, pink, sky blue
It would be an influence rather than the whole idea.
(Except perhaps for the lovely dress in the middle!)
So next time sketchbook to work through some of these ideas.

Colour palette:


Neutral brown granite
neutral blue-grey

Contrasting colour


For all over colour

Contrasting colour living coral
Contrasting colour

Jester red accessories/ in patterns

sweet lilac accessories/ in patterns
This fiesta red is too intense and orange
so cancel that 

Thursday 24 January 2019

Underground upholstery design

Upholstery underground
I saw the way this design is interesting to look at both macro and micro, is definitely about London, and is practical, all at the same time. And it made me want to know who designed it and what else they have done.

Turns out it was a design consultancy called Wallace Sewell (Their website)

Some other things they have done can be seen on their website.

They obviously have a fantastic way with colour, using unusual combinations in a way that looks fun and friendly. I particularly like the rug they designed to celebrate 100th anniversary of the underground, using all the colours of the lines on the tube map. 

Finding out about this has led me to some of the other designers who have made fabrics for the underground since the Metropolitan line opened in 1863.

Link to the London Transport Museum webpage about this

Another take on the designs

My pinterest board about this

Designs by Enid Marx, one of the 1930s/1940s designers

I find the 30s designs very appealing. There's something about the geometric/ repeating organic patterns that looks organic and interesting. Something worth exploring in my sketchbook session.

I've also be reviewing 30s fashion with a view to making some clothes for myself.  My 1930s pinterest board. It seems to me that there are three 'styles' there:

1. Madame Vionnet, and more affordably Ghost bias cut dresses. These are the ones that famously sexy women have worn in the evening. They float around the curves and make the wearer look longer and more feminine.

2. Day dresses, often of cotton or silk, in patterns like the 30s ones I've pinned above. These tend to have a high waist (higher than natural waist in some cases) and an unstructured bust, with the length hitting at the widest part of my calf ie not flattering, and while I love the patterns I can't get away from the feeling that they are intrinsically dowdy. (On me at least).

3. Sports clothing. By which I mean beach pyjamas, jodhpurs, tailored straight skirts with some movement at the knee or below, tailored wide-leg turn up tweed trousers, little silk blouses with some feminine embroidery at the neck, lumpy home made jumpers and cardigans with ribbed waist and sometimes puffed sleeves. Shoes are brogues with a heel or riding boots. Hair is generally short and wavy. This is the one for me! I've started making a 30s influenced woollen biker jacket which I'll post when it's done.

Monday 21 January 2019

Investigating my favourite colours

One of the more memorable things about 'Interaction of Colour' by Joseph Albers is that each of his students tended to prefer colours that had the same qualities as their own physical colouration. This has been percolating round my brain for a few years now and it seems to be time to pay more attention to this aspect of my making.

I once 'got my colours done' by a lovely woman with House of Colour, and this is what she came up with: I am a summer which means that the natural colours of my body, eyes, hair etc are cool and muted (at least compared to pure colours). She then tried lots of actual coloured fabrics against my face, and came up with a hierarchy of which colours are best for me to wear. 


Hanky made out of my body colours as divined by House of Colour.
The large rectangles are the colours which best complement my natural colouring.
The squares are next best, and the triangles good only in small amounts.
You can see that my very best colours are all dark or bright, although not as dark as black or as bright as neon. They look darker and brighter on me than they would on a person with a 'winter' colour range.

So how does this professional analysis relate to the colours I have chosen myself? If Joseph Albers was right, I should be naturally choosing colours in the summer range. 


Here are some of the things I have made to test out that idea:

Skin stole (detail) has a base of slightly nude pink, with marks in mid-pink and coral, all muted colours. But perhaps that's cheating as it's meant to be like skin and naturally I used mine as a base.


One the right is the outside and below the inside of a piece I made to express how different I feel inside and out. You might think that the outside appearance is more cool and clear, but in fact the pale blue is slightly greyed. The inside is also slightly muted and despite the hotness of the impression it gives it is actually a cool pink.


On the left is a cloak which has 
colours that are obviously outside 
the 'summer' range. But I made this
cloak to reflect the personality and colouring of one of my daughters, straying deliberately from my usual
colours.


This is a t-shirt I screen printed. At the time I was telling myself off for making it so grey-looking!

On the right is a rather unsuccessful drawing of a duck skeleton. Looking at it now it seems obvious that the colours
 I chose were awkward and clashing because of being in different colour families, (among other problems.)


Hm. Interesting.

To explore this a little more, I decided to try to match each of the biggest colour patches using silk dye. And secondly to overlay them on the silk so I could see what kind of colours they make when mixed together.

Here are the first two colours. The red was easy - just a touch of yellow added to the magenta. The green a mixture of cyan and yellow. where they overlap they make the dark purple of the hanky. The actual green is more like the deeper one where the two green lines overlap.

As I want them to bleed into each other I haven't put any gutta on the silk, so the edges are irregular and it looks pretty messy. I was using a hairdryer to try to reduce spread.


Unfortunately there was one colour, the cornflower blue, that I can't mix using the three primaries and black which is all the silk dye I have. It ended up looking blue-grey and very watery, which mucked up the look of the square.

I do like the way the edge of the purple vertical line has run in a wiggly pattern a bit like fjords.


The final square against the light. It looks sort of like tartan, and making it has certainly reminded me that since I like creating fabrics myself it might be a fun exercise to repeat this square on a loom, using yarns of the best colours.

It is striking that it is made up almost entirely of medium-dark colours, with some brights, meaning that there's not a lot of contrast. I wonder what it would be like to put one or two of the paler of my body colours into this square? How would the contrast affect the way the other colours appear? 

What I have learned from this colour exploration:
  • Joseph Albers was probably right!
  • I need to work out how to make cornflower blue 
  • These colours blend together beautifully, so if I stick to them my work will blend together too (and if I don't it will look awkward and jarring, like the duck skeleton)
  • Some of the overlapping colours haven't mixed (see the vertical green row), presumably because they were dried out before the second was painted.
  • These dyes are very radiant so don't look much different against the light.

What I could do next time:
  1. Try redoing this square with cornflower blue too. With gutta separating the colours, but sticking to the idea that where they overlap gives another good colour. That way I wouldn't have to use the hairdryer and the colours would have more chance of mixing well on the overlapping squares.
  2. Redo the square without gutta (which looks too white) with one or two of the palest colours from my palette. Or with the silver gutta I have which would fit into my palette.
  3. Experiment with a smaller selection of colours to find out how the colours interact with each other.
  4. Some of the colours are darker than I can make with a single application, and it would be good to have a record of all the colours in different degrees of intensity, so I could try out each colour in one, two, three etc layers.
  5. Try to replicate the fjord pattern.
  6. Repeat the exercise on my loom.


Ah! This might help to explain why I want to paint all the rooms in the house rather intense moody colours! (And why my 'winter' husband would rather they were all stark white).

Sunday 20 January 2019

Exploring geological shapes

As a starting point for some sketchbook experiments, I have taken some geological shapes and colours that appeal. 


musée cantonal de géologie - wikipedia
this photo reminds me of hermits caves
I can't help wondering what's lurking inside.
A good image for my inner/outer person work


'Bulls eyes' in malachite
http://midgagmsorg.ipage.com/?page_id=1105

Malachite always catches my attention. The colour to start with - it's so very intense!
And the shapes keep your attention going round and round - and intrinsic excellent composition - it's unpredictable but all at one with itself.  


malachite pattern wallpaper from decorpad.com
I'm not the only one who finds this attractive.


https://www.homedepot.com/p/
York-Wallcoverings-Urban-Chic-Malachite-Wallpaper-
RK4508/206976952 caption
I want to have a go at making these shapes and colour relations.


The black and white is here to help me with the tone relationships.


There is also something so interesting about the geological layers in rocks. I particularly like the way they combine the hardness and the friability in one. You can't help seeing the immense timeline involved in making this shape.


This is actually a drawing! by the very patient Kate Atkin
http://visualsundae.com/post/26174216691/kate-atkin-drawing

And sometimes the colours are so vibrant and complex.
It reminds you that the most intense colours are usually made from rocks.


https://www.pexels.com/photo/cusco-peru-rainbow-mountains-south-america-371464/


https://pxhere.com/en/photo/1082467
Canyon rock landscape nature mountain usa


https://en.wikipedia.org/wiki/Onyx
And look at the complexity of this image. Fantastic!
rock-273392_960_720.jpg


I haven't been able to find the kind of striations I am looking for (which I'm sure exist!) which look a bit like a colourful bendy supermarket code bar. 

What do these images that look beautiful to me have in common?
- intense colours
- wide tonal range from pale to dark
- repeating shapes that despite being repeated are all different from each other 
- the awesomeness of nature 

I want to work with all of these images, but for next time it's going to be the malachite.


https://www.minerals.net/mineral/malachite.aspx

Sample 1:

Using felt in a variety of colours and paper glue I made spirals to capture some of the qualities of the appearance of malachite.
And I made it from double thickness strips which I then cut in half to produce a flatter top surface. 

The four colours weren't working together, and they were far from flat on the top.


Sample 2:

For this sample I used only three of the colours, reflecting the light, medium and dark tones of the actual malachite. 

But the dark brown didn't quite work with the others.

I noticed that using strips all starting at the same point and then rolling them created some unnecessary resistance to making the final shape.


Sample 3:


These quiet circles were made without the neon green. I was getting the hang of the glueing process by now and it shows in the relative neatness.


Sample 4:

This one is made without the brown, and I think the combination of colours has more of the intensity of the rock. (Although at this point I'm just playing around so the moment that the intensity matters is well in the future).
On the right is the same one cut into 2 with large scissors.


Here's the best one of all.

Putting all these spirals together gave me this, which is fun, but I wondered whether making concentric circles would reflect the structure of the rock better than spirals.


Sample 5: 
First I reflected on the best combination of colours. Given that I needed one light, one medium and one dark, the choice was between excluding the dark green, or excluding mid-light tone teal. I went for keeping the mid tone green just because it was nearer to the middle of the two other colours.
 For this concentric circle sample I sewed the strips together instead of gluing them, thinking that it would be easier and allow me to create more interesting shapes than gluing. This first one I made a soft triangle, with two colours in the middle, just like a shape on the wallpaper above.


Sample 6:


Here are samples 5 & 6 joined together. The colours are different because the light is much lower now.

I was able to introduce some of the more organic aspects of the shapes here - different depths of different colours, incomplete circles. These certainly worked better than the spirals, but the sewing meant they took a lot longer to make.


What I learned from making these samples:

  • There are three colours (light, medium and dark) plus accent lines, and it's likely to be difficult to find felt in the correct tones. Neon doesn't work as the light colour as it comes forward in the wrong way
  • Fabric glue works better than paper glue!
  • The finished concentric circles are soft, appealing, and probably hardwearing.
  • They look best when there's a spot of one dark or light colour in the middle (or both)
  • They are not circles! They are 'compression fit' shapes of different compositions and sizes that gives malachite some of it's variability.
  • Making the strips the width of two circles allows me to sew the bottom too and make two at once. They are not identical because there is a loss of structure and some of the layers at the bottom.
  • Having variable thickness of the colours is part of the organic look
  • Gluing is quicker, but sewing is much tidier and allows deliberate shaping.
What I could try next time:
  1. Make a lot more concentric circles with organic type pattern breaks
  2. Use PVA or fabric glue instead of paper glue
  3. Make longer cylinders that I can cut into slices
  4. Try different slicing tools
  5. What if I make some with thick but frayable fabric?
  6. Or different textures of fabric?
  7. How does it work if I sew all the slices in the cylinder separately before slicing?
  8. How can I pack them together to enhance the compression fit effect?
  9. What if I make the same shapes but with flat cut-out shapes superimposed on each other?