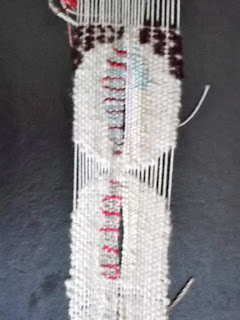
This was my first thought - lots of entrances alongside each other. I sorted out a selection of yarns to do this with, but after a while it seemed to me that I did want the oval shape to be there.
Like the sketchbook image of knobbles only, it lost something without the 3Dness.
What I found out from doing this:
1. I made the warp a little too close together for it to be completely covered as is usual in tapestry weaving. But I like the squared pattern it gives to the oval shapes, and might want to do the final sample that way too.
2. It was difficiult to get the slit to be symmetrical and even, and the edge is not smooth because of the yarns turning back on the edge. Does this matter?
3. Even trickier with different narrrow strips of yarns on the narrow edges of the slits. However, I think this worked well with the pale pink on the near edge, and the blue-grey emphasising the curve.
4. The weft becomes uneven when I pull it tight to make the slit open up a bit. This may be less obvious when there are several rows of ovals. Can I use this uneven quality?
5. Good contrast between silk and wool shininess on the right hand side. I noticed that I needed a slightly oranger version of the dark pink, and tried a couple of different ones out on the third oval. The grey is a good colour and dry texture. I tried out a bluer version but it didn't have the dryness, and didn't look right against the cream so I will be using the original grey - upholstery twine!
6. Even though it takes much longer I am much more confident experimenting with weaving than I am with printing.
7. Thought about whether the edge patterns should taper at the top and bottom, and decided that they should on the right but not on the left.
8. The ovals need to be a little more extended at top and bottom as shells are not actually oval, and it emphasises the organic nature of it better.
9. I stopped at the third oval because it was obvious that this is going to work nicely, and I knew what I needed to know to make the sample. I put the beads and spots onto the third one at the end.
10. I prefer the way the unwoven warps look to the 'crocodle skin' I tried at the top. It goes better with the dry, seaside, bleached look of the rest of it.
So, that's as far as I've got while I haven't been blogging.
Next step - think about whether it is going to be a collar or a bag.


No comments:
Post a Comment